This is the first part in a series teaching how to set up and utilize some of the most important tools for iOS app penetration testing.
The series will be assuming that the user is using Electra jailbreak. I am specifically using iOS 11.1.2, but most of the tools in the series should work on any version of iOS 11. I don’t have an 11.3.1 device and only know for certain that bfinject (and therefore the decryption tool and cycript) has not been updated for 11.3.1.
1: Jailbreaking Your Phone
While it’s possible to conduct pentests on a non-jailbroken device, you will need to be jailbroken to truly run a comprehensive test using all of the tools available to you. This section will be short, since the jailbreak process is quite simple – you can download Electra for 11.0-11.1.2 here, and for 11.2 – 11.3.1 here.
Installation instructions can be found here.
2: SSH Into Your Device
Electra comes installed with OpenSSH – which means you will be able to ssh into your device right away. You will need to do this for almost everything while pentesting
- Find your iPhone’s IP address – go to Settings -> Wi-Fi. Click on the ‘i’ icon next to the WiFi you are connected to and note down the IP address
- Open up a new terminal window, and type
ssh root@XX.X.X.XXX(where X is the IP address you found).
- When prompted for a password, type ‘alpine’ – this is the default password, and you should change it immediately for security reasons (more info on that here).
When you’re done, you should see something like this:
My-iPhone:~ root#And you’re done!
3: Decrypting the App
Once you’re jailbroken, you are ready to start penetration testing. Generally, the first step is to crack your chosen target app and inspect its files and binary. On iOS 11, you will do this using a tool called ‘bfinject’.
Bfinject is a .dylib injection tool for iOS 11.0 – 11.1.2. It includes both decryption functionality, and cycript (which we will get to later).
To install bfinject, start by downloading the tarball here. Then you will need to copy it over onto your device:
- In your terminal that is ssh’d into your phone, to create a folder by typing:
$ mkdir bfinject - Then, you will need transfer over the tarball onto your device and into the bfinject folder. You can do this in a lot of ways – You can use scp, but I prefer to use Cyberduck, which you can download here. If you’re using CyberDuck, go to ‘Open Connection’ at the top left, choose SSH protocol, and login using the same IP/password as before (you can leave the port as 22).
- Now, in either Cyberduck or by terminal, navigate into the bfinject folder on your device, and upload the tarball from your Mac. To do this in Cyberduck, click on ‘Action’, and then ‘Upload’.
- Finally, run:
$ tar xvf bfinject.tar
Before you run bfinject, you will need to download ‘Core Utilities’ from Cydia. Open up Cydia and search for it. Once you’ve selected it, go to ‘Modify’ and then ‘Install’.
Now we are ready to crack your first app. This can be most any app downloaded from the app store (that you have permission to test!). Make sure the app is open and in the foreground on your phone, and that your phone is plugged into your computer. In your root terminal, navigate to the bfinject folder and run:
$ bash bfinject -P <AppName> -L decrypt You’ll see something like this in your terminal:
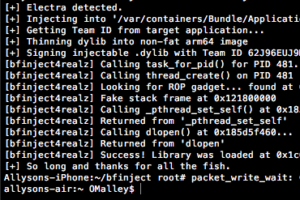
After a few seconds, you should get a message on your phone that decryption is complete. You can say ‘No’ when it asks if you’d like to use netcat. Now, to get the decrypted .ipa file, you need to find the app’s directory on your phone. In Cyberduck or Terminal, navigate here: /private/var/mobile/Containers/Data/Application
As a note – since the directories in your phone can be kind of confusing, to get to the ‘var’ directory, you will need to ‘cd ..’ from ‘root’, which is where you initially are after ssh’ing in.
Inside the Application directory, you will see a bunch of folders with random names. Each of these corresponds to an app on your device. To help you quickly figure out which one corresponds to your target app, you can sort on Cyberduck by ‘Modified’, and the most recently installed app should be the first. Go inside that folder once you’ve found it, and inside its Documents directory you will find the decrypted-app.ipa. Download it in Cyberuck by going to ‘Action’->’Download as’. Rename the file as whatever you want, but make sure to change the extension to ‘.zip’ instead of ‘.ipa’ so you can easily inspect the contents.
Now you have officially decrypted and downloaded your first app!
4) class-dump
The next tool we are going to use is extremely valuable – it will dump the runtime headers of the app’s classes and will help us to understand the app’s structure, and to choose where we want to target.
To install on your Mac, open up a new terminal and run:
$ brew install class-dumpThen, find the app’s executable. After you unzip the .ipa/.zip file you copied to your computer, you will find it in the resulting folder at the path /Payload/AppName.app/AppName
Now, you can run
./class-dump <AppName>.app/AppName > DumpedIf you get an error, you can try installing a different spinoff of class-dump: try this or this. Depending on the version, if you still get an error try changing <AppName>.app/AppName to just <AppName> or <AppName.app>.
Now, open up the ‘Dumped’ file in your favorite text editor, and you should see all of the app’s runtime headers.
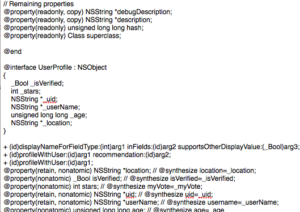
I usually start by searching for words like ‘password’, ‘authentication’, ‘user’, or ‘credentials’ to identify any interesting classes, methods or properties.
This concludes Part 1! In Part 2, I will go over installing, exploring and tampering with cycript. Part 3 will cover Frida/Objection, and Part 4 will go over debugging/binary patching with Hopper and lldb.
